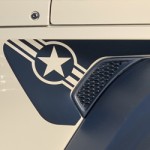
Menu
Your Cart

10% OFF  on $100+ order  -   CODE: "HKLRY23"  | Monthly Specials - CLICK HERE

Tesla Front bumper PPF: paint protection DIY kit

Model Y PPF Model 3 PPF film
Tesla Front bumper PPF: paint protection DIY kit

Description

DIY Kit for front bumper of your Tesla Model 3 Model Y. No professional installation needed. Just use water + soap solution. Affordable option for most people dont want to spend a lot of money.  Precut Paint Protection Film Clear Bra PPF Decal Film

  • Clear PPF (paint protection film) that protects your bumper
  • Cheaper alternative without wrapping professionally
  • Precut protection against rock chips scratches bugs road debris light scratches
  • 38" x 9.5" shaped like the photo
  • 6 mil of protection 
  • Lasts 5 years / UV coated/protected
  • Similar to 3M scotchguard
  • Easy install with wet water soap solution

  • Stock: In Stock
  • SKU: VS846
$85.00
Tesla interior and exterior accessories for your 2010 - 2022. We buy sell & trade OEM replacement graphics, decals and sticker as well as aftermarket accessories for these same models.

Decals are Made out of Automotive professional grade Oracal 651 and 3M 1080 Vinyl - die cut on professional plotter that last 6 years / UV coated/protected. All these items are made for 2021 2022 Model X, Model S, Model Y, Model 3 with different options.

Vortex Signs offers only professional grade and precision decal kits for DIYers and professional body shops. From Hood graphics, front bumper grills, protectors, hood stripes to body line graphics, side door stripes, badges, emblems, reflective stickers sill plates, trunk and bumper stickers, door inserts, fender has stripes, quarter panel decals with very unique designs. All new kits. We also offer custom graphics to your likings. Just let us know what you need.

Write a review

Note: HTML is not translated!
Bad Good
Captcha

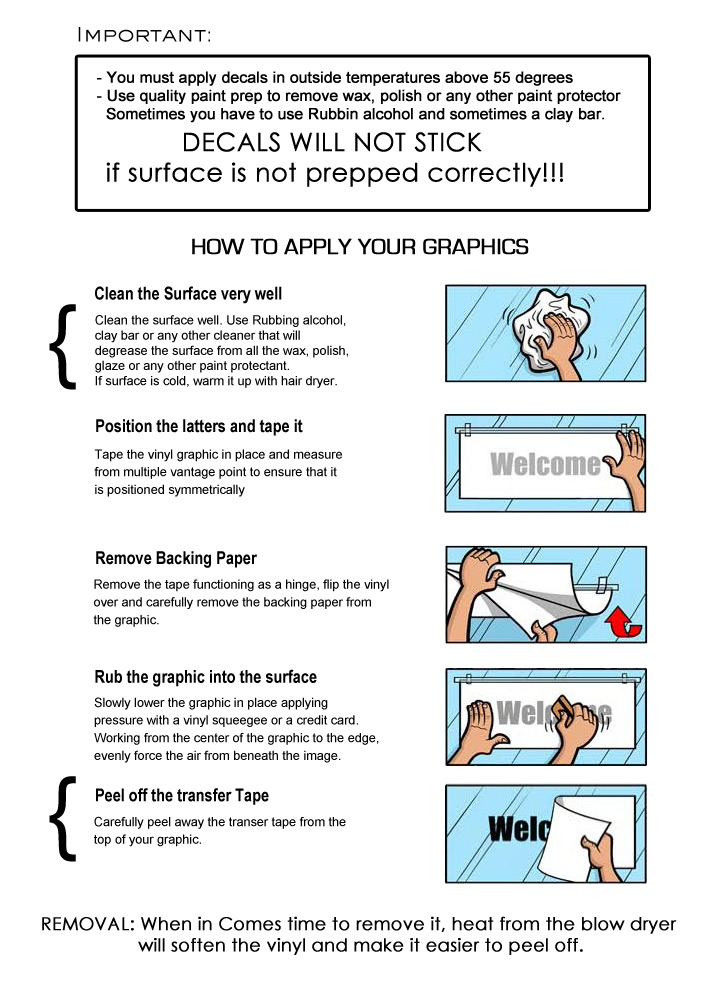
Note: A clear transfer tape (or application tape) will be provided to help with the installation.

1. Clean surface and allow surface to completely dry
2. Peel back the paper backing from the transfer tape
3. Place the decal on the surface
4. Carefully using a credit card or your fingers to push down on the decals
5. Slowly remove the transfer tape away from the surface ensuring decal does not peel off with the transfer tap